Here’s a quick post to help one of my friends/clients figure out how to insert an image into a post using the new WordPress 2.5 interface. Figured this might be helpful to others as well so here it is.
First, when you’re writing a post you want to click on the icon for adding new media as shown in the image below.
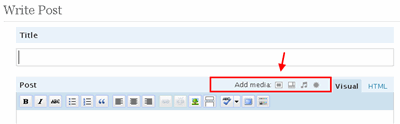
The new functionality lets you upload a variety of new media types into your blog. Think of this little toolbar as the old upload tool in previous versions of WordPress.
Once you click on the icon you’ll see something similar to the image below, initially you’ll pretty much just see the button identified by the #1.
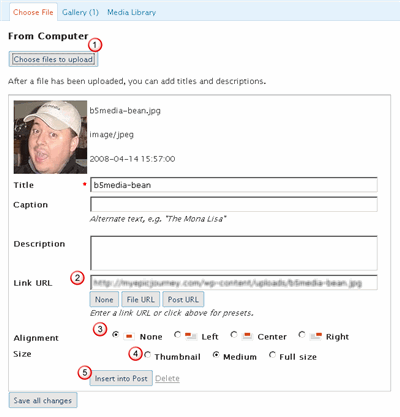
When you press “Choose files to upload” you’ll be presented with the familiar Windows browse to file dialog window.
After you select the file you want to upload, you’ll see the image as shown above.
You can now complete the rest of the dialog box as needed. The only required field is the “Title”.
When I upload an image to my post I normally display it full-size, so I rarely make use of the Link URL (#2) field that let’s you pop-open a thumbnail into the full-sized version of the original image. I normally select “None” for the Link URL then.
Choose how you want text to flow around your image by selected an alignment option (#3). Quick tip, depending on your WordPress template, I suggest using an image no larger than 400px in width. I usually won’t wrap text around an image that’s wider than 200px.
As I stated earlier, I normally always display images in my posts at their full-size (#4).
When you’ve got everything completed, just click on “Insert into Post” (#5) and you’re all set.
You can also avoid all of that complication by using my preferred blogging tool Windows Live Writer.