I could be wrong, but more than likely I think you have a folder or folders (or maybe an entire hard drive) full of images. Your digital camera and your cell phone are all taking up more bits and bytes of storage space on your hard drive. Frequently, the ability to work through an entire folder of files and either resize them, rename them or even save them into a different file format can mean the difference between hours of work and just a few minutes.
One of the tools I keep in my software toolbox is called IrfanView. It’s a free image viewing program that’s loaded with features for editing and working with your graphic and image files. Aside from using it as a quick image viewer, I use it most for running batch processes on image files.
This post will guide you through how to use IrfanView to take those hours of file edits down to just a few minutes.
If you haven’t already, go ahead and download IrfanView and install it on your system.

Step-by-Step Guide to Batching Files in IrfanView
My first recommendation for getting started is to place a copy of all your files you want to work with in a folder by themselves. Notice I said “COPY”. I’m guessing that these photos are probably important to you and you’d prefer not to lose them due to some unforeseen glitch in your system or mistake in using IrfanView the first time.
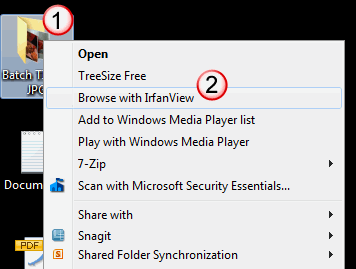
Once you’ve got the folder loaded with all of your files (#1), you’ll want to right-click on the folder and look for the option to “Browse with IrfanView” option in the sub-menu (#2).
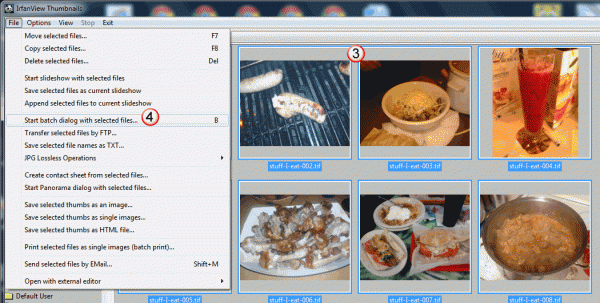
Once you’ve selected that option the IrfanView program window will display with thumbnails displayed that were located in the folder you selected.
The next thing you’ll want to do is select all of the thumbnails (#3) in the window. You can do this easily by left-clicking on one of them to select it and then hitting CTRL+A on your keyboard to select all of them at once.
Once you’ve selected all of them, go to the “File” in the menu bar and look for the option labeled “Start batch dialog with selected files…” (#4).

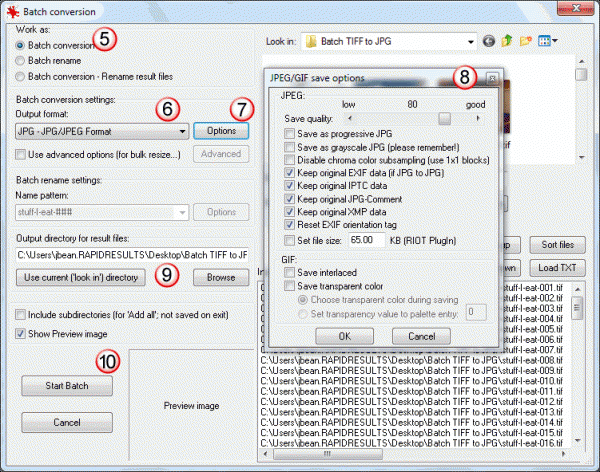
You should now see the Batch conversion dialog where you can set all the different options available to you within IrfanView to make changes to your files all in one action.
There are three basic options to choose from:
– Batch conversion: allows you to resize, change file type and a multitude of other options
– Batch rename: allows you to quickly rename all your files very quickly
– Batch conversaion – Rename result files: allows you to do everything to your files all at once
For our example, we’re just going to do a Batch conversion (#5).
All of my files are currently in TIF format. Not the best file option for file size efficiency or to share with others on the web, so we’re going to change our “Output format:” to “JPG – JPG/JPEG Format” (#6).

I should mention that by default when you save to JPG format in IrfanView, the quality settings default to 80% of their quality originally. If you’d like to keep these files at 100% quality and just change the file format click on the “Options” button (#7).
A smaller window will open with a variety of settings. More than likely you’ll just want to leave everything as it is except for the slider at the top. Just slide it to the far right for 100% quality (#8). When you’re done, click “OK” on this window and be taken back to the “Batch Conversion” window.
The next step you’ll want to take is to specify where to save the resulting files. Since you’re changing the file type, you can keep the new files into the same directory because nothing will be written over with the change. Click on the “Use current (“look in”) directory” button (#9) to set this location.
Once that’s set, just click on the “Start Batch” button (#10).

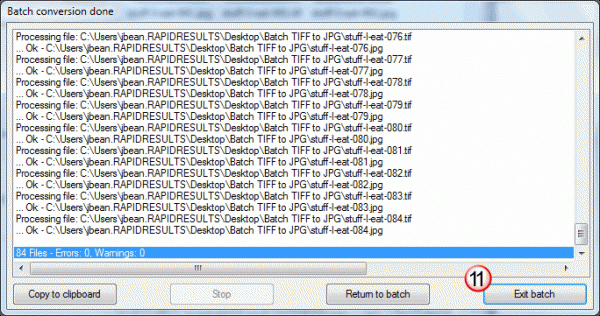
You’ll be able to see the file paths update as IrfanView works through the batch making the conversions you requested. Once it’s done, just click on the “Exit Batch” button (#11) and you’re done.
Did I mention you can save a bit of disk space by resizing and saving files to the appropriate file type for its use? My folder of 84 TIF files was taking up about 1.5MB per file on average, using around 105MB for the entire folder. By batch converting all of them to a JPG format instead, that dropped the individual file size down to around 70Kb on average and a total folder size down to 4.5MB.
Thank you very much indeed to whoever wrote these insructions – from someone who needs all the help they can get with anything even remotely different on the computer! These instructions were clear, concise, very easy to follow and even better for people like me – didn't contain any mystifying computer-jargon. I usually just give up trying to follow 'experts', as they aren't so 'expert' when it comes to explanations, but I have successfully done exactly what I wanted to do. Thanks again.
Glad I could help Susan!