• Skip to primary navigation
  • Skip to main content
  • Skip to primary sidebar
  • Skip to footer

Bnpositive's Blog

  • Home
  • Blog
  • About Me
  • Contact Me
  • FREE Local SEO Audit
You are here: Home / Archives for image files

image files

12/02/2015 By Jason Bean Leave a Comment

Image Optimization? What Do You Mean

Image optimization seems to be one of those simple steps that's frequently just ignored or not understood fully by many individuals and businesses active online. I have a number of friends and family members that I help them with their websites, social media and online marketing efforts. After receiving a recent email distribution from my brother I thought I'd take the opportunity to share with you some of the suggestions I gave him about image optimization in his recent usage.

Image Optimization Example

The first step to really optimizing an image is to resize it to the size you're going to be displaying it at on your website or in your email newsletter. Granted these days with broadband Internet pipes and fiber optic connections this isn't as noticeable as it once was. But I can still usually immediately identify a non-optimized image when I see it slowly come into view after the rest of the content has already loaded.

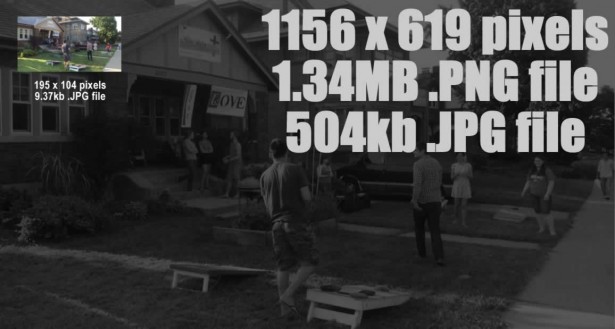
In the example above, the image in the email was displayed at just under 200 pixels in width. But the actual image file used remained at its larger dimensions of over 1100 pixels in width. This is also frequently seen when people take photos from their phone or digital camera and just upload them directly in the original resolution and formatting size.

Image Optimization by File Type

The second simple step to image optimization is to save them in the best format option for the type of media graphic.

WordPress.jpgGenerally photographic images should always be saved as a .JPG file like the image in this post example.

This would also include any graphics that have smooth gradients or variations of colors. Like in the WordPress logo example to the right. This smooth transition from the lighter blue to the darker blue should be handled by saving as a .JPG or .PNG file.

For simple, limited color line graphics like logos and such, generally you’ll prefer to use .GIF as file format as shown in the Amazon logo below. Bold blocks of solid color.

Amazon.com

The PNG format is very popular and can be used for both graphics and photos. Quality will be good but generally the file size will be significantly higher without compression compared to the other options available.

In the example above with the photo, it was displayed in the email in the smaller dimensions of the color photo (195 x 104 pixels). With image optimization by resizing the photo first and saving it as a .JPG, the file size would have been a little over 9Kb instead of 1.34MB for the original, full-sized PNG file that was used. That’s a 99% decrease in file size!

Even if the original photo would have been saved in the same dimensions but only as a .JPG instead of .PNG, it would have been saving almost a 3rd of the file size: 504kb instead of 1.35MB

So, think about your images before you just pop them into your website or email. Be sure to also keep a copy of your original sized image so you can always come back to the full resolution version if necessary in the future. Perhaps in a future post I'll also talk about optimizing your image file names before you upload them as well.

Filed Under: Featured, Technology Tagged With: email, file format, file size, gif, image files, image formats, image optimization, jpg, photos, png, resolution, WordPress

11/16/2011 By Jason Bean 2 Comments

How to Use IrfanView to Batch Process Image Files

I could be wrong, but more than likely I think you have a folder or folders (or maybe an entire hard drive) full of images. Your digital camera and your cell phone are all taking up more bits and bytes of storage space on your hard drive. Frequently, the ability to work through an entire folder of files and either resize them, rename them or even save them into a different file format can mean the difference between hours of work and just a few minutes.

One of the tools I keep in my software toolbox is called IrfanView. It’s a free image viewing program that’s loaded with features for editing and working with your graphic and image files. Aside from using it as a quick image viewer, I use it most for running batch processes on image files.

This post will guide you through how to use IrfanView to take those hours of file edits down to just a few minutes.

If you haven’t already, go ahead and download IrfanView and install it on your system.

Batch Process Files with IrfanView

Step-by-Step Guide to Batching Files in IrfanView

My first recommendation for getting started is to place a copy of all your files you want to work with in a folder by themselves. Notice I said “COPY”. I’m guessing that these photos are probably important to you and you’d prefer not to lose them due to some unforeseen glitch in your system or mistake in using IrfanView the first time.

Once you’ve got the folder loaded with all of your files (#1), you’ll want to right-click on the folder and look for the option to “Browse with IrfanView” option in the sub-menu (#2).

Once you’ve selected that option the IrfanView program window will display with thumbnails displayed that were located in the folder you selected.

The next thing you’ll want to do is select all of the thumbnails (#3) in the window. You can do this easily by left-clicking on one of them to select it and then hitting CTRL+A on your keyboard to select all of them at once.

Once you’ve selected all of them, go to the “File” in the menu bar and look for the option labeled “Start batch dialog with selected files…” (#4).

Select Thumbnails and Batch Process in IrfanView

You should now see the Batch conversion dialog where you can set all the different options available to you within IrfanView to make changes to your files all in one action.

There are three basic options to choose from:

– Batch conversion: allows you to resize, change file type and a multitude of other options
– Batch rename: allows you to quickly rename all your files very quickly
– Batch conversaion – Rename result files: allows you to do everything to your files all at once

For our example, we’re just going to do a Batch conversion (#5).

All of my files are currently in TIF format. Not the best file option for file size efficiency or to share with others on the web, so we’re going to change our “Output format:” to “JPG – JPG/JPEG Format” (#6).

Configure Batch Conversion Settings in IrfanView

I should mention that by default when you save to JPG format in IrfanView, the quality settings default to 80% of their quality originally. If you’d like to keep these files at 100% quality and just change the file format click on the “Options” button (#7).

A smaller window will open with a variety of settings. More than likely you’ll just want to leave everything as it is except for the slider at the top. Just slide it to the far right for 100% quality (#8). When you’re done, click “OK” on this window and be taken back to the “Batch Conversion” window.

The next step you’ll want to take is to specify where to save the resulting files. Since you’re changing the file type, you can keep the new files into the same directory because nothing will be written over with the change. Click on the “Use current (“look in”) directory” button (#9) to set this location.

Once that’s set, just click on the “Start Batch” button (#10).

Finish Batch Process of Files in IrfanView

You’ll be able to see the file paths update as IrfanView works through the batch making the conversions you requested. Once it’s done, just click on the “Exit Batch” button (#11) and you’re done.

Did I mention you can save a bit of disk space by resizing and saving files to the appropriate file type for its use? My folder of 84 TIF files was taking up about 1.5MB per file on average, using around 105MB for the entire folder. By batch converting all of them to a JPG format instead, that dropped the individual file size down to around 70Kb on average and a total folder size down to 4.5MB.

Filed Under: Technology Tagged With: batch conversion, batch process, image files, image management, IrfanView

Primary Sidebar

Recent Posts

Person Studying at Laptop

Why Studying Is The Best Thing You Can Do While Unemployed

Covid-19 increased unemployment in many countries. The United States suffered from business … [Read More...] about Why Studying Is The Best Thing You Can Do While Unemployed

Laptop Credit Card - Online Shopping

5 Smart Tips for Safe Online Shopping in 2021

Online shopping is fast becoming the new norm. Thanks to the freedom, convenience, and ease it … [Read More...] about 5 Smart Tips for Safe Online Shopping in 2021

Setting a Budget at Christmastime

There are two types of people in the world: Savers and spenders. At Christmas, it is much easier to … [Read More...] about Setting a Budget at Christmastime

RSS Positively Indy

  • Video Multimedia Salute to Veterans on Indianapolis Monument Circle
  • Money Tasks to Remember for the Summer

RSS Mission Notes | Faith & Culture

  • Review: “Take Back Your Life” Devotional from Levi Lusko
  • How to Live Stream Your Church Service or Sermon This Weekend

RSS Homeschool Daddy

  • Listening and Understanding on a Budget: Helping Teens Make Healthy Decisions
  • Tips and Resources for Being the Best Parent You Can Be

Premium WordPress Themes from InkThemes.com
The Bouqs - Premium Farm Direct Flowers

Footer

  • Clients
  • Archives
  • Advertising Disclosure
  • Domain For Sale
  • Comment Policy

Copyright © 2021 · Executive Pro On Genesis Framework · WordPress · Log in