Image optimization seems to be one of those simple steps that's frequently just ignored or not understood fully by many individuals and businesses active online. I have a number of friends and family members that I help them with their websites, social media and online marketing efforts. After receiving a recent email distribution from my brother I thought I'd take the opportunity to share with you some of the suggestions I gave him about image optimization in his recent usage.

The first step to really optimizing an image is to resize it to the size you're going to be displaying it at on your website or in your email newsletter. Granted these days with broadband Internet pipes and fiber optic connections this isn't as noticeable as it once was. But I can still usually immediately identify a non-optimized image when I see it slowly come into view after the rest of the content has already loaded.
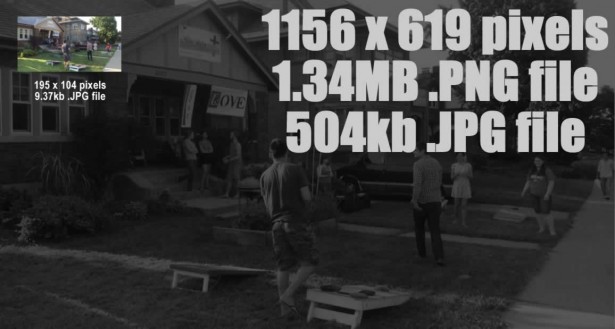
In the example above, the image in the email was displayed at just under 200 pixels in width. But the actual image file used remained at its larger dimensions of over 1100 pixels in width. This is also frequently seen when people take photos from their phone or digital camera and just upload them directly in the original resolution and formatting size.
Image Optimization by File Type
The second simple step to image optimization is to save them in the best format option for the type of media graphic.
 Generally, photographic images should always be saved as a .JPG file like the image in this post example. So if you're doing corporate headshot photography, you should save your photos as .JPG file.
This would also include any graphics that have smooth gradients or variations of colors. Like in the WordPress logo example to the right. This smooth transition from the lighter blue to the darker blue should be handled by saving as a .JPG or .PNG file.
For simple, limited color line graphics like logos and such, generally you'll prefer to use .GIF as file format as shown in the Amazon logo below. Bold blocks of solid color.

The PNG format is very popular and can be used for both graphics and photos. Quality will be good but generally the file size will be significantly higher without compression compared to the other options available.
In the example above with the photo, it was displayed in the email in the smaller dimensions of the color photo (195 x 104 pixels). With image optimization by resizing the photo first and saving it as a .JPG, the file size would have been a little over 9Kb instead of 1.34MB for the original, full-sized PNG file that was used. That's a 99% decrease in file size!
Even if the original photo would have been saved in the same dimensions but only as a .JPG instead of .PNG, it would have been saving almost a 3rd of the file size: 504kb instead of 1.35MB
So, think about your images before you just pop them into your website or email. Be sure to also keep a copy of your original sized image so you can always come back to the full resolution version if necessary in the future. Perhaps in a future post I'll also talk about optimizing your image file names before you upload them as well.